![]()
This is a two part series on setting up an ELK stack to receive syslog and in the next post Bro logs. The ELK stack is an awesome collection of software but a complicated MumboJumboCombo of components. I wanted to help break that barrier for beginners and to help explain how each component works. So stick with me on this two part series! I would like to give credit to this DigitalOcean post writer for the ELK stack write-up which I’ll be referencing. Additionally my Github contains a script to setup the ELK stack for CentOS 7 64-bit based on the guide below.
ELK Stack Explained
This guide will be to the best of my ability and my understanding of the ELK stack. The ELK stack has three main components which are Elasticsearch, Logstash, and Kibana.
- Elasticsearch – As stated by the creators “Elasticsearch is the heart of the ELK stack”. Elasticsearch is a search engine based on Lucene. It provides a distributed, multitenant-capable full-text search engine with an HTTP web interface and schema-free JSON documents. Elasticsearch is a NoSQL type database and contains all your data for your ELK stack.
- This is the most important component of the entire stack! Once you understand how data is ingested and retrieved from Elasticsearch then all the components of the ELK stack make more sense.
- Logstash – A service used for log collection, processing, and ingesting data into Elasticsearch.
- Kibana – Provides visualization capabilities on top of the content indexed on an Elasticsearch cluster.
Elasticsearch
Document breakdown
- Documents – A basic set of data that can be indexed.
- Type – Allows you to assign types to documents in an index and the types are defined by the user. For instance if we are collecting all logs in an index we may assign a type of Nginx to Nginx logs and assign a type of SSH to SSH logs.
- Indexes – A collection of documents that have similar characteristics.
- Shard – Shard is the process of separating a large index into multiple pieces. These shards may be distributed among an Elasticsearch cluster.
Interacting with Elasticsearch
Elasticsearch provides a full Query DSL based on JSON to define queries. Therefore we can use tools like curl to GET (retrieve), PUT (insert), DELETE (remove) data.
GET
- GET Index List:
curl -X GET "http://<IP addr of ES>:9200/_cat/indices?v"
- GET Index Documents:
curl -X GET "http://<IP addr of ES>:9200/<index>/_search?pretty=true"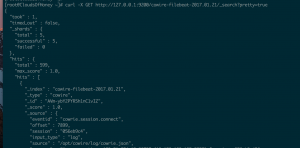
PUT
- PUT Document in index:
curl -X PUT "http://<IP addr of ES>:9200/<index>/<type>/<id>"
DELETE
- Delete document in index:
curl -X DELETE "http://<IP addr of ES>:9200/<index>/<type>/<id>"
Logstash
Logstash is an application that takes in data, filters the data, and then outputs the data to Elasticseach.
Logstash configs
- Inputs – In the example below we have an input block that takes in beat(Filebeat, Winbeat, Packetbeat, and Topbeat) type data on port 5044. The data coming in must be encrypted so we need to decrypt the incoming data. Inputs can be configured to accept specific types of incoming data like JSON, designate different ports, or specify local files as input.
- Filters – In the example below we have a filter block that can be filter out specific types of data and manipulate incoming data before it’s stored in the specified output. Filters can be used to look for specific logs like incorrect login attempts in Apache logs. Filters give you the ability to rename field names or remove unwanted fields. Filters can include plugins such as GeoIP location that will take IP addresses as input and add GPS coordinates to the data to be displayed in Kibana.
- Codecs – Filters can be set to certain codecs such as JSON, CSV and etc.
- Codecs: https://www.elastic.co/guide/en/logstash/current/codec-plugins.html
- Grok parse – Allows you to parse incoming data that is unstructured into a more structured format.
- Outputs – In the example below we have an output block that takes all incoming filtered data and stores it in Elasticsearch. In this filter we specifying what Elasticsearch node to store the data, the index we want to store the data in, and defining the document_type of the incoming data. Logstash provides alternative output types so you can store information in a database or a file.
Logstash Config Example
###################### Input ######################
input {
  beats {
    port => 5044
    ssl => true
    ssl_certificate => "/etc/pki/tls/certs/logstash-forwarder.crt"
    ssl_key => "/etc/pki/tls/private/logstash-forwarder.key"
  }
}

###################### Filter ######################
filter {
  if [type] == "syslog" {
    grok {
      match => { "message" => "%{SYSLOGTIMESTAMP:syslog_timestamp} %{SYSLOGHOST:syslog_hostname} %{DATA:syslog_program}(?:\[%{POSINT:syslog_pid}\])?: %{GREEDYDATA:syslog_message}" }
      add_field => [ "received_at", "%{@timestamp}" ]
      add_field => [ "received_from", "%{host}" ]
    }
    syslog_pri { }
    date {
      match => [ "syslog_timestamp", "MMM  d HH:mm:ss", "MMM dd HH:mm:ss" ]
    }
  }
}

###################### Output ######################
output {
  elasticsearch {
    hosts => ["http://localhost:9200"]
    index => "%{[@metadata][beat]}-%{+YYYY.MM.dd}"
    document_type => "%{[@metadata][type]}"
  }
}
Kibana
Kibana as stated above is our visual component of the ELK stack to represent Elasticsearch data in a graphical fashion. Kibana allows a user to create visualizations such as bar graphs, pie charts, line charts GeoIP maps, and more! Once visualizations are created they can be added to dashboards to separate visualization of data of separate entities or to combine visualizations on a single dashboard to get a high level view of the data.
Visualizations
- Visualizations are a visual representation of a set of data.
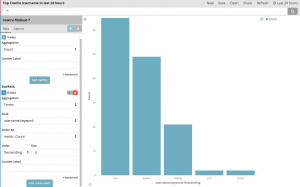
- In the photo below we are creating a bar graph visualization in Kibana. When creating this visualization we define our X and Y axis and supply the input data for each axis. The Y axis is defined as count and the X axis is defined by the input type of username. This visualization also needs a default bar count which is 5 and whether the bars should be ascending or descending order. Additionally, in the top right we define the time frame to pull data from which is set to the past 24 hours.
Dashboards
- Dashboards are a collection of visualizations.
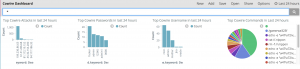
- I am currently running a Cowire honeypot and I have created multiple visualizations for data I want to see.
- Top Cowire Attackers in past 24 hours
- Top Cowire Passwords in past 24 hours
- Top Cowire Username in past 24 hours
- Top Cowire Commands in past 24 hours
Sharing Kibana Visualizations
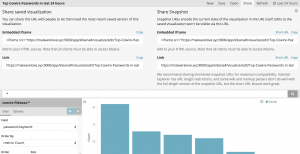
- Select the visualization and select “Share” in the top right.
- You can copy the iframe and place it in a custom web app to display the visualization contents.
ELK Stack Install/Setup
Install/Setup NTP Time sync
- sudo yum install ntp ntpdate ntp-doc -y
- sudo systemctl enable ntpd
- sudo systemctl start ntpd
- sudo ntpdate pool.ntp.org
Install/Setup Elasticsearch
- yum install java-devel -y
- sudo rpm –import https://artifacts.elastic.co/GPG-KEY-elasticsearch
echo '[elasticsearch-5.x]

name=Elasticsearch repository for 5.x packages

baseurl=https://artifacts.elastic.co/packages/5.x/yum

gpgcheck=1

gpgkey=https://artifacts.elastic.co/GPG-KEY-elasticsearch

enabled=1

autorefresh=1

type=rpm-md ' | sudo tee /etc/yum.repos.d/elasticsearch.repo
- sudo yum -y install elasticsearch
- sudo sed -i ‘s/#network.host: 192.168.0.1/network.host: localhost/g’ /etc/elasticsearch/elasticsearch.yml
- sudo systemctl enable elasticsearch
- sudo systemctl start elasticsearch
Install/Setup Kibana
- sudo rpm –import https://artifacts.elastic.co/GPG-KEY-elasticsearch
echo '[kibana-5.x]

name=Kibana repository for 5.x packages

baseurl=https://artifacts.elastic.co/packages/5.x/yum

gpgcheck=1

gpgkey=https://artifacts.elastic.co/GPG-KEY-elasticsearch

enabled=1

autorefresh=1

type=rpm-md ' | sudo tee /etc/yum.repos.d/elasticsearch.repo- sudo yum -y install kibana
- sudo /bin/systemctl daemon-reload
- sudo /bin/systemctl enable kibana.service
- sudo systemctl start kibana.service
Install/Setup Nginx + Let’s Encrypt/OpenSSL
- sudo yum -y install epel-release
- sudo yum -y install nginx httpd-tools
- sudo htpasswd -c /etc/nginx/htpasswd.users <username>
- sudo cp /etc/nginx/nginx.conf /etc/nginx/nginx.conf.bak
- sed -i -e ‘38,87d’ /etc/nginx/nginx.conf
- This will delete the default server block in the nginx.conf
- sudo mkdir /etc/nginx/ssl
- sudo openssl req -x509 -nodes -days 365 -newkey rsa:2048 -keyout /etc/nginx/ssl/nginx.key -out /etc/nginx/ssl/nginx.crt
- sudo openssl dhparam -out /etc/ssl/certs/dhparam.pem 2048
cat > /etc/nginx/conf.d/kibana.conf << 'EOF'
server {
listen 443 ssl;
server_name _;root /usr/share/nginx/html;
index index.html index.htm;ssl_certificate /etc/nginx/ssl/nginx.crt;
ssl_certificate_key /etc/nginx/ssl/nginx.key;ssl_protocols TLSv1 TLSv1.1 TLSv1.2;
ssl_prefer_server_ciphers on;
ssl_dhparam /etc/ssl/certs/dhparam.pem;
ssl_ciphers 'ECDHE-RSA-AES128-GCM-SHA256:ECDHE-ECDSA-AES128-GCM-SHA256:
ECDHE-RSA-AES256-GCM-SHA384:ECDHE-ECDSA-AES256-GCM-SHA384:DHE-RSA-AES128-GCM-SHA256:
DHE-DSS-AES128-GCM-SHA256:kEDH+AESGCM:ECDHE-RSA-AES128-SHA256:ECDHE-ECDSA-AES128-SHA256:
ECDHE-RSA-AES128-SHA:ECDHE-ECDSA-AES128-SHA:ECDHE-RSA-AES256-SHA384:ECDHE-ECDSA-AES256-SHA384:
ECDHE-RSA-AES256-SHA:ECDHE-ECDSA-AES256-SHA:DHE-RSA-AES128-SHA256:DHE-RSA-AES128-SHA:
DHE-DSS-AES128-SHA256:DHE-RSA-AES256-SHA256:DHE-DSS-AES256-SHA:DHE-RSA-AES256-SHA:AES128-GCM-SHA256:
AES256-GCM-SHA384:AES128-SHA256:AES256-SHA256:AES128-SHA:AES256-SHA:AES:CAMELLIA:
DES-CBC3-SHA:!aNULL:!eNULL:!EXPORT:!DES:!RC4:!MD5:!PSK:!aECDH:!EDH-DSS-DES-CBC3-SHA:!EDH-RSA-DES-CBC3-SHA:!KRB5-DES-CBC3-SHA';ssl_session_timeout 1d;
ssl_session_cache shared:SSL:50m;
ssl_stapling on;
ssl_stapling_verify on;add_header Strict-Transport-Security max-age=15768000;
auth_basic "Restricted";
auth_basic_user_file /etc/nginx/htpasswd.users;location / {
proxy_pass http://localhost:5601;
proxy_http_version 1.1;
proxy_set_header Upgrade $http_upgrade;
proxy_set_header Connection 'upgrade';
proxy_set_header Host $host;
proxy_cache_bypass $http_upgrade;
}
}
EOF- sudo systemctl start nginx
- sudo systemctl enable nginx
- sudo setsebool -P httpd_can_network_connect 1
Let’s Encrypt Setup
- sudo yum install certbot -y
echo 'server {

location ~ /.well-known {

allow all;

}

}

' | sudo tee /etc/nginx/conf.d/le-well-known.conf- sudo systemctl start nginx
- sudo systemctl enable nginx
- sudo certbot certonly -a webroot –webroot-path=/usr/share/nginx/html -d <domain> -d www.<domain>
- sudo openssl dhparam -out /etc/ssl/certs/dhparam.pem 2048
cat > /etc/nginx/conf.d/kibana.conf << 'EOF'

server {

listen 80 default_server;

listen [::]:80 default_server;

server_name _;

return 301 https://$host$request_uri;

}

server {
listen 443 ssl;
server_name ${domainName} www.${domainName};ssl_certificate /etc/letsencrypt/live/${domainName}/fullchain.pem;
ssl_certificate_key /etc/letsencrypt/live/${domainName}/privkey.pem;ssl_protocols TLSv1 TLSv1.1 TLSv1.2;
ssl_prefer_server_ciphers on;
ssl_dhparam /etc/ssl/certs/dhparam.pem;
ssl_ciphers 'ECDHE-RSA-AES128-GCM-SHA256:ECDHE-ECDSA-AES128-GCM-SHA256:ECDHE-RSA-AES256-GCM-SHA384:ECDHE-ECDSA-AES256-GCM-SHA384:DHE-RSA-AES128-GCM-SHA256:DHE-DSS-AES128-GCM-SHA256:kEDH+AESGCM:ECDHE-RSA-AES128-SHA256:ECDHE-ECDSA-AES128-SHA256:ECDHE-RSA-AES128-SHA:ECDHE-ECDSA-AES128-SHA:ECDHE-RSA-AES256-SHA384:ECDHE-ECDSA-AES256-SHA384:ECDHE-RSA-AES256-SHA:ECDHE-ECDSA-AES256-SHA:DHE-RSA-AES128-SHA256:DHE-RSA-AES128-SHA:DHE-DSS-AES128-SHA256:DHE-RSA-AES256-SHA256:DHE-DSS-AES256-SHA:DHE-RSA-AES256-SHA:AES128-GCM-SHA256:AES256-GCM-SHA384:AES128-SHA256:AES256-SHA256:AES128-SHA:AES256-SHA:AES:CAMELLIA:DES-CBC3-SHA:!aNULL:!eNULL:!EXPORT:!DES:!RC4:!MD5:!PSK:!aECDH:!EDH-DSS-DES-CBC3-SHA:!EDH-RSA-DES-CBC3-SHA:!KRB5-DES-CBC3-SHA';
ssl_session_timeout 1d;
ssl_session_cache shared:SSL:50m;
ssl_stapling on; ssl_stapling_verify on;
add_header Strict-Transport-Security max-age=15768000;# The rest of your server block
root /usr/share/nginx/html;
index index.html index.htm;auth_basic "Restricted";
auth_basic_user_file /etc/nginx/htpasswd.users;location / {
proxy_pass http://localhost:5601;
proxy_http_version 1.1;
proxy_set_header Upgrade $http_upgrade;
proxy_set_header Connection 'upgrade';
proxy_set_header Host $host;
proxy_cache_bypass $http_upgrade;
}
}
EOF
- sudo rm -rf /etc/nginx/conf.d/le-well-known.conf
- sudo systemctl restart nginx
- sudo setsebool -P httpd_can_network_connect 1
- sudo certbot renew
echo '30 2 * * 1 /usr/bin/certbot renew >> /var/log/le-renew.log

35 2 * * 1 /usr/bin/systemctl reload nginx

' >> /etc/crontab - To test your security: https://www.ssllabs.com/ssltest/analyze.html?d=<domain>
Install/Setup Logstash and Syslog Collector
- WARNING: I am setting up Logstash with no SSL. Please refer to the resource/sources section to find a guide that setups up SSL.
echo '[logstash-5.x]

name=Elastic repository for 5.x packages

baseurl=https://artifacts.elastic.co/packages/5.x/yum

gpgcheck=1

gpgkey=https://artifacts.elastic.co/GPG-KEY-elasticsearch

enabled=1

autorefresh=1

type=rpm-md

' | sudo tee /etc/yum.repos.d/logstash.repo- sudo yum -y install logstash
- cd /usr/share/logstash
- sudo ./bin/logstash-plugin install logstash-input-beats
- cd /etc/logstash/conf.d/
- sudo wget https://raw.githubusercontent.com/Benster900/ElkProjects/master/SyslogCollector/02-beats-input.conf
- sudo wget https://raw.githubusercontent.com/Benster900/ElkProjects/master/SyslogCollector/10-syslog-filter.conf
- sudo wget https://raw.githubusercontent.com/Benster900/ElkProjects/master/SyslogCollector/30-elasticsearch-output.conf
- sudo systemctl restart logstash
- sudo systemctl enable logstash
Load Kibana Custom-made Dashboards(Optional)
- cd ~
- curl -L -O https://download.elastic.co/beats/dashboards/beats-dashboards-1.1.0.zip
- sudo yum -y install unzip
- unzip beats-dashboards-*.zip
- cd beats-dashboards-*
- ./load.sh
Install/Setup FirewallD
- sudo yum install firewalld -y
- sudo systemctl start firewalld
- sudo systemctl enable firewalld
- sudo firewall-cmd –zone=public –permanent –add-service=http
- sudo firewall-cmd –zone=public –permanent –add-service=https
- sudo firewall-cmd –zone=public –permanent –add-service=ssh
- sudo firewall-cmd –zone=public –permanent –add-port=5044/tcp
- sudo firewall-cmd –reload
Install/Setup Filebeat on client to forward Syslogs
- sudo yum install filebeat -y
- mkdir /etc/filebeat/conf.d/
- cp /etc/filebeat/filebeat.yml /etc/filebeat/filebeat.yml.bak
cat > /etc/filebeat/filebeat.yml << EOF

filebeat:

registry_file: /var/lib/filebeat/registry

config_dir: /etc/filebeat/conf.doutput.logstash:

hosts: ['<domain/IP addr of ELKstack server>:5044']

EOF
cat > /etc/filebeat/conf.d/syslog.yml << EOFfilebeat.prospectors: - input_type: log paths: - /var/log/* fields: document_type: syslog EOF- sudo systemctl enable filebeat
- sudo systemctl start filebeat
Intro tutorial to searching Kibana Data
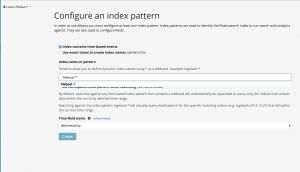
Select default index pattern
- Browse to "https://<domain/IP addr of kibana server>
- Enter "filebeat-*" into "Index pattern" and press Enter
- Then "@timestamp" for Time-field name then select "Create"
Search for data
Kibana allows a user to enter strings to search for entries based on text or by specific attribute and string combo.
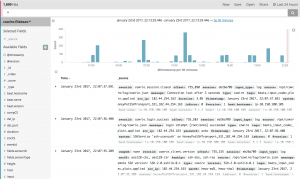
All entries within a time frame
- By default Kibana has a "*" in the search bar for all entries. In the top right a user can select a time frame to show all documents within that time frame. In the screenshot below we see all documents within the past 24 hours.
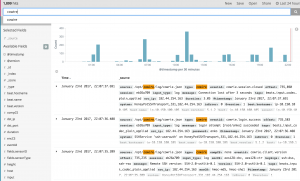
Specific string search
- A user can enter a string to search all documents for the specific string. As you can see below the string "cowire" shows up multiple times within one document so it's not filtering on a granular fashion. However we can use attribute and a string combo.
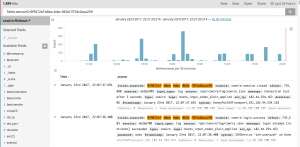
Attribute and string combo search
- With an attribute and string combo we can have a more granular defined search for documents. Instead of returning documents that contain a string it will only return documents with attributes that contain that string. In the screenshot below you can see I am search for all documents that contain a specific sensor ID of "9f9672ef-b8ea-4dec-863d-707dc0aca259".
Resources/Sources
- Install Elasticsearch, Logstash, and Kibana (ELK Stack) on CentOS 7
- Github - ELKProjects
- Elasticsearch Basic Concepts